Wednesday, August 22, 2012

Robot Test Automation Framework - Write your test library in Python and/or Java


             In this tutorial I will help you to write a simple program in Robot Test Framework. As usual we will start with installation.

             For Robot to work we need Python, Jython, WxPython to be installed on the machine. So lets first install them before we do anything else.
Python Installation 
Step 1: Download Python for Windows from http://www.python.org/getit/windows/ and doubleclick on the installer


Step 2: Complete the installation


Step 3: Put Python bin directory in the environment Variable PATH
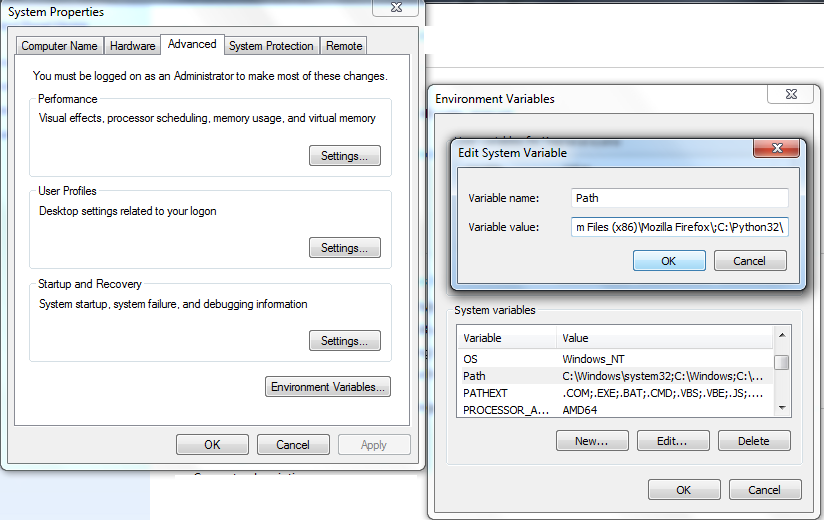

Step 4: Verify the installation by typing 'python' on your command prompt


Jython Installation 
          Using test libraries implemented with Java or using Java tools internally requires running Robot Framework on Jython, which in turn requires Java Runtime Environment (JRE). 

           Installing Jython is a fairly easy procedure, and the first step is getting an installer from http://jython.org. The installer is an executable JAR package, which you can run from the command line like java -jar jython_installer-<version>.jar. 

           Depending on the system configuration, it may also be possible to just double-click the installer.

Step 1: Download Jython for Windows from http://jython.org/downloads.html and on command prompt type 'java -jar jython_installer-<version>.jar' where <version> needs to be replaced by the actual version


Step 2: Complete the installation process


Robot Installation
Step 1: Download Robot for Windows from http://downloads.robotframework.org/ and double click on the installer


Step 2: Complete the installation process


 WxPython Installation
Step 1: Download WxPython for Windows from http://wxpython.org/download.php#stable and double click on the installer


Robot-RIDE Installation
Step 1: Download Robot-RIDE for Windows from https://github.com/robotframework/RIDE/downloads/ and double click on the installer

Step 2: On command prompt go to scripts directory where python is installed <PYTHON_INSTALLED_DIR>\scripts and type 'ride.pyc'. You will see following screen where you can write your Test cases


Writing simple Test Case in Robot-RIDE
         Let us write a Test Case to check whether a particular directory exists or not on our machine.
     
        From file menu select new project give it some name like Example. Now right click on this project and select New Test Case. Give it some name like My Test. Also right click on project and select New User Keyword and give a name like My Keyword.

       There are some libraries which are by default provided by Robot like OperatingSystem which provides functionality of some operating system keywords like File operations, directory operations, etc...

        So we first import this library in the Project Page. Also Add Scalars for all variables you need to use in your Tests like path and MESSAGE in this case.


                    In the Test Case page, write your test case like <keyword> and <arg1> <arg2> .... In this case Log and My Keyword are keywords and ${MESSAGE} and ${path} are args.


                 Where My Keyword is a keyword created by user by adding some available keywords from library as show below. In this case we are using Directory Should Exist keyword and argument as ${path}.


 Running Test Case in Robot-RIDE
           Simply hit the Run button shown as "robot face" in the robot-RIDE screen.


Logs of Test Case in Robot-RIDE
          Below is a sample log file


Reports in Robot-RIDE
          This is a sample report in Robot-RIDE


We can also write our own libraries in Robot using either Java or Python. We will look into it in later posts.

~Yagnanarayana Dande

Thursday, January 12, 2012

Running Hadoop Pig Scripts with MapR Demo VM


What is Hadoop Pig?

Apache Pig is a platform for analyzing large data sets. Pig's language, Pig Latin, lets you specify a sequence of data transformations such as merging data sets, filtering them, and applying functions to records or groups of records. Pig comes with many built-in functions but you can also create your own user-defined functions to do special-purpose processing.

Pig Latin programs run in a distributed fashion on a cluster (programs are complied into Map/Reduce jobs and executed using Hadoop). For quick prototyping, Pig Latin programs can also run in "local mode" without a cluster (all processing takes place in a single local JVM).

How to install?

Download VMWare Player at
http://downloads.vmware.com/d/info/desktop_downloads/vmware_player/3_0
Download MapR Demo VM at
http://package.mapr.com/releases/v1.2.0/vmdemo/MapR-VM-1.2.0.12140GA-1-m3.tar.bzip2

1. Extract this using
bunzip2 MapR-VM-1.2.0.12140GA-1-m3.tar.bzip2 (This shows some errors but you can ignore them)
tar -xvf MapR-VM-1.2.0.12140GA-1-m3.tar (if output file is not .tar and is tar,out still its okay)
2. After untartting this transfer it to Windows machine
3. Install VMWare Player and start the Demo VM


How to Run it?

local mode


mapreduce mode


Problem to Solve

Marks of Students in Unit Test1 in Subjects Telugu, Hindi, English, Maths, Science and Social respectively. Now Class Teacher wants to Find all the students who are Failed?


Pig Script to solve this

A = load 'Unit1' using PigStorage('\t') as (Name:chararray,Telugu:int,Hindi:int,English:int,Maths:int,Science:int,Social:int);

B = filter A by Telugu < 35 OR Hindi < 35 OR English < 35 OR Maths < 35 OR Science < 35 OR Social < 35;


DUMP B;


Here is the Output of the Pig Script


Monday, December 5, 2011

TestNG - Run your first test using ant

Let us write our First Test in TestNG and run as an ant task

Create Directory Tree Structure  as follows

testng(Base Directory)
    |
    +-------+-------------------------+---------------+------------+
    |          |                          |                 |           |
    src    lib                       build.xml  build    test-output/index.html
     |          |                                         |            |
    com testng-6.3.1.jar                  com           +-------+-----+---
      |                                                 |        index.html
     qa                                              qa
       |                                                 |
     OurFirstTestNGTest.java            OurFirstTestNGTest.class

Where as

OurFirstTestNGTest.java contains
=============================
package com.qa;

import org.testng.annotations.*;
import org.testng.*;

public class OurFirstTestNGTest {
    int testInt;

    @BeforeMethod
    public void setUp() {
        testInt = 0;
    }

    @Test
    public void addTest() {
        testInt++;
        Assert.assertEquals(testInt,1);
        System.out.println("Addition Test");
    }

    @Test
    public void subtractTest() {
        testInt--;
        Assert.assertEquals(testInt,-1);
        System.out.println("Subtract Test");
    }
}
=============================

build.xml contains
=============================
<project default="test">

 <path id="cp">
   <pathelement location="lib/testng-6.3.1.jar"/>
   <pathelement location="build"/>
 </path>

 <taskdef name="testng" classpathref="cp"
          classname="org.testng.TestNGAntTask" />

 <target name="test">
   <testng classpathref="cp">
     <classfileset dir="build" includes="**/*.class"/>
   </testng>
 </target>

</project>
=============================


Now to Compile a java class, use
#javac -classpath .:../lib/testng-6.3.1.jar -d ../build com/qa/OurFirstTestNGTest.java

To run using ant
#ant test

TestNG - Run your First Test

From TestNG official site, 

"TestNG is a testing framework inspired from JUnit and NUnit but introducing some new functionalities that make it more powerful and easier to use".

It was voted for over JUnit because of better reporting and executing capabilities from Testing team's perspective.

From deployment point of view, TestNG is just a jar file which can be copied onto a local machine and can be used by putting it in classpath. TestNG can be downloaded @ http://testng.org/doc/download.html

Let us write our First Test in TestNG.

Create Directory Tree Structure  as follows

testng(Base Directory)
    |
    +-------+-----+------------------------------+---------+
    |          |     |                                  |           |
    src    lib  testng.xml                    build    test-output/index.html
     |          |                                         |            |
    com testng-6.3.1.jar                  com           +---------+-------+---
      |                                                 |        index.html
     qa                                              qa
       |                                                 |
     OurFirstTestNGTest.java            OurFirstTestNGTest.class

Where as

OurFirstTestNGTest.java contains
=============================
package com.qa;

import org.testng.annotations.*;
import org.testng.*;

public class OurFirstTestNGTest {
    int testInt;

    @BeforeMethod
    public void setUp() {
        testInt = 0;
    }

    @Test
    public void addTest() {
        testInt++;
        Assert.assertEquals(testInt,1);
        System.out.println("Addition Test");
    }

    @Test
    public void subtractTest() {
        testInt--;
        Assert.assertEquals(testInt,-1);
        System.out.println("Subtract Test");
    }
}
=============================


testng.xml contains
============================
<!DOCTYPE suite SYSTEM "http://testng.org/testng-1.0.dtd" >
<suite name="test">
  <test name="test">
    <classes>
       <class dir="build" name="com.qa.OurFirstTestNGTest" />
    </classes>
  </test>
</suite>
============================

Now to Compile a java class, use
#javac -classpath .:../lib/testng-6.3.1.jar -d ../build com/qa/OurFirstTestNGTest.java

and to run the tests, use
#java -classpath .:build:./lib/testng-6.3.1.jar org.testng.TestNG testng.xml

Sunday, February 27, 2011

Pseudo-randomness - An essential ingredient of Software Test Automation

Many of us may be reluctant to consider random testing as a testing technique. But study in [1] indicates that random testing is more cost effective for many softwares.

This form of testing is useful when the time needed to implement and execute test case sequence is too long or the complexity of the problem makes it impossible to test every combination. Most of the times certain amount of Random Testing is mandatory before release which will be specified in the Release criteria.

Random testing is also known as Gorilla testing . In it we don't test the application sequentially, we just take the modules/fields randomly & perform testing whether it's functioning properly.


In this method test case/ test data is selected randomly. Even the slightest bugs can be discovered with minimal cost. It can also compete with other test techniques in terms of coverage. A hybrid approach by combing random testing with other testing techniques may yield good results.

Random Testing can imply any of the following
  1. Input Data generation
    Example: You need to test new functionality of your application. For testing you randomly generate data for all existing and new fields in the application under test. 
  2. Selection of Test Cases
    Example: You need to test new functionality of your application. For testing you randomly select test cases for the application under test.
But the biggest problem with Random Testing is the Randomness it self. "How to reproduce the bug?" is the biggest question as the steps taken are truly Random.
 This is the place where pseudo-randomness came to rescue.

According to Wikipedia: A pseudorandom process is a process that appears to be random but it is not. Pseudorandom sequences typically exhibit statistical randomness while being generated by an entirely deterministic causal process. Such a process is easier to produce than a genuine random one, and has the benefit that it can be used again and again to produce exactly the same numbers, useful for testing and fixing software.

Let us write a small program and see how does pseudo-randomness work

In the below program we will try to generate a set of 50 random numbers which are in between 0 and 100.

import java.util.Random;

public class PseudoRandom{
  public static void main(String[] args)
                throws NumberFormatException{
    if(args.length>0){
      Long seed = Long.parseLong(args[0]);
      Random pseudo = new Random( seed );
      for ( int i=0; i<50; i++ )
      {
         // This will generate random number
         // in between 0 and 100
         int number = pseudo.nextInt( 101 );
         System.out.print( number+"," );
      }
      System.out.println("Done...");
    }else{
      System.out.println("Usage: \t PseudoRandom seed");
      System.out.println("\t Where seed is any number which
      can be used \n\t again and again to produce
      exactly the same numbers");
      System.out.println("");
      System.out.println("Example:  PseudoRandom 284");
    }
  }
}

Usage of this program

java PseudoRandom
Usage: PseudoRandom seed
     Where seed is any number which can be used
     again and again to produce exactly the same numbers

Example: PseudoRandom 284


Run the Program

qa-by-passion:/qa# java PseudoRandom 284
2,28,50,35,1,75,6,29,49,15,44,21,62,42,26,69,2,17,34,6,98,67,15,58,69,22,90,45,16,70,64,3,72,4,41,63,62,46,37,91,35,99,4,95,67,72,100,85,68,46,Done...
qa-by-passion:/qa#  java PseudoRandom 284
2,28,50,35,1,75,6,29,49,15,44,21,62,42,26,69,2,17,34,6,98,67,15,58,69,22,90,45,16,70,64,3,72,4,41,63,62,46,37,91,35,99,4,95,67,72,100,85,68,46,Done...
qa-by-passion:/qa#  java PseudoRandom 284
2,28,50,35,1,75,6,29,49,15,44,21,62,42,26,69,2,17,34,6,98,67,15,58,69,22,90,45,16,70,64,3,72,4,41,63,62,46,37,91,35,99,4,95,67,72,100,85,68,46,Done...
qa-by-passion:/qa#  java PseudoRandom 316
70,79,19,5,31,73,87,83,35,71,21,64,77,100,50,99,90,28,52,83,96,32,93,32,5,48,93,52,25,73,27,100,28,3,54,35,21,52,73,78,69,0,32,74,72,35,86,30,80,55,Done...
qa-by-passion:/qa#  java PseudoRandom 675
19,33,4,82,93,94,31,49,2,31,4,84,11,0,97,36,25,87,75,28,3,71,96,84,3,17,50,34,86,18,29,59,15,99,78,98,4,99,88,59,23,1,49,77,74,14,55,9,75,27,Done...
qa-by-passion:/qa#  java PseudoRandom 284
2,28,50,35,1,75,6,29,49,15,44,21,62,42,26,69,2,17,34,6,98,67,15,58,69,22,90,45,16,70,64,3,72,4,41,63,62,46,37,91,35,99,4,95,67,72,100,85,68,46,Done...

Analysis

If we observe the results of the above run we can see when ever the seed is the same the set of numbers are same. This is a way to create pseudo randomness where numbers are generated randomly but can repeat the same results whenever required by providing same seed.


How to use?

This behavior will be very useful for situations where reproducing the same scenarios is required.

For this purpose we can use following logic.

Put all the test cases in an Array List<String>
Create a set of Random numbers which are in between 0 and Size of Array List. Now get the elements with that index and execute tests (in TestNG) as follows

ant -Dtestcase=ArrayList[RandNumber]

For generating every set use a seed as discussed earlier and if you hit a bug with some set of tests then you can re-execute same set of tests in same order by just providing the same seed.

I hope this explains the importance of Pseudo-randomness

References:
------------------
[1] Joe W. Duran, Simeon C. Ntafos, "An Evaluation of Random Testing", IEEE Transactions on Software Engineering, Vol. SE-10, No. 4, July 1984, pp438-443.

Saturday, December 11, 2010

Lookbusy - A simple application for generating synthetic load on a Linux system

During stress tests it is required to make computational resources like memory, disk space and cpu busy. For this one can do cpu intense operations or memory intense operations or disk intensive operations.

In software testing, a system stress test refers to tests that put a greater emphasis on robustness, availability, and error handling under a heavy load, rather than on what would be considered correct behavior under normal circumstances. In particular, the goals of such tests may be to ensure the software does not crash in conditions of insufficient computational resources (such as memory or disk space), unusually high concurrency, or denial of service attacks. - Wikipedia

One can design different tools for this purpose. While browsing last week in my free time I came across this tool on net which is designed exactly for this purpose. It is working perfectly and very easy to use. Thanks to Devin Carraway <lookbusy@devin.com> for providing such a great tool. 


Setup

  1. Download Tool which is available at: http://www.devin.com/lookbusy/download/lookbusy-1.3.tar.gz
  2. Extract the tar ball in some directory
  3. cd into the extracted directory
  4. Issue ./configure
  5. Issue make
  6. Issue 'make install'
  7. You are done with the installation and ready to use
Usage

yagna@yagna-desktop:~/Desktop/lookbusy-1.3$ ./lookbusy --help

usage: lookbusy [ -h ] [ options ]
General options:
  -h, --help           Commandline help (you're reading it)
  -v, --verbose        Verbose output (may be repeated)
  -q, --quiet          Be quiet, produce output on errors only

CPU usage options:
  -c, --cpu-util=PCT,  Desired utilization of each CPU, in percent (default
      --cpu-util=RANGE   50%).  If 'curve' CPU usage mode is chosen, a range
                         of the form MIN-MAX should be given.
  -n, --ncpus=NUM      Number of CPUs to keep busy (default: autodetected)
  -r, --cpu-mode=MODE  Utilization mode ('fixed' or 'curve', see lookbusy(1))
  -p, --cpu-curve-peak=TIME
                       Offset of peak utilization within curve period, in
                         seconds (append 'm', 'h', 'd' for other units)
  -P, --cpu-curve-period=TIME
                       Duration of utilization curve period, in seconds (append
               'm', 'h', 'd' for other units)

Memory usage options:
  -m, --mem-util=SIZE   Amount of memory to use (in bytes, followed by KB, MB,

                         or GB for other units; see lookbusy(1))

  -M, --mem-sleep=TIME Time to sleep between iterations, in usec (default 1000)

Disk usage options:
  -d, --disk-util=SIZE Size of files to use for disk churn (in bytes,
                         followed by KB, MB, GB or TB for other units)
  -b, --disk-block-size=SIZE
                       Size of blocks to use for I/O (in bytes, followed
                         by KB, MB or GB)
  -D, --disk-sleep=TIME
                       Time to sleep between iterations, in msec (default 100)
  -f, --disk-path=PATH Path to a file/directory to use as a buffer (default
                         /tmp); specify multiple times for additional paths

Increase Memory Utilization by 1GB

lookbusy -m 1GB

You can verify by using either top or dstat(dstat -m).

Increase CPU Utilization to 70%

lookbusy -c 70

You can verify by using either top or dstat(dstat -cp)

Thursday, October 28, 2010

Executing Tests in multiple environments using Selenium Grid

                      Our Business Team came up with a requirement of having support for multiple Browsers like Google Chrome, Internet Explorer 6, Internet Explorer 7 and Internet Explorer 8. Till yesterday I was happily executing my Selenium tests in firefox and now I have to find a way in which I can run my test cases in different browsers. First thought I got is to install all the browsers on my laptopn and test. But unfortunately I realized that I cannot install all the Internet Explorer versions on single machine. So I have started exploring different options and came across Selenium Grid. It is an extension of Selenium Core. The idea is simple there will be a Master and many slaves. Master will give the commands and slaves will be executing these commands.

Process of setting up Selenium Grid.

These steps have to done both on Master and Slave machines. 
  1. Download and install the Java JRE. Verify the installation by issuing a command "java -version" on command prompt.
  2. Download and extract Apache Ant and put the path in PATH environment variable. Verify the installation by issuing a command "ant -version" on command prompt.
  3. Download and extract Selenium Grid.
You are done with the setup. :)

Making a machine master
  1. In Command prompt from the folder where you have extracted "Selenium Grid" run "ant launch-hub"
  2. To Verify just got to http://localhost:4444/console from your favourite browser
  3. There will be 3 tables on the Web Page. First shows Environments defined in file named "grid_configuration.yml" located at the root directory of the extracted location of selenium grid. the second column shows what remote controls are available and the third column shows what remote controls are currently running tests.
  4. For our purpose let us add some new environments for Internet Explorer 6, Internet Explorer 7, Internet Explorer 8. Copy paste the following lines at the end of "grid_configuration.yml"
       - name:    "*iexplore6"
         browser: "*iexplore"
       - name:    "*iexplore7"
         browser: "*iexplore"
       - name:    "*iexplore8"
         browser: "*iexplore"
You are done with Master Setup. :)

Making a machine which is having Internet Explorer 6 installed as slave

 In Command prompt from the folder where you have extracted "Selenium Grid" run
ant -Denvironment=*iexplore6 launch-remote-control -DhubURL=http://192.168.0.111:4444 -Dhost=192.168.0.112
where 192.168.0.111 is the ipaddress of Master and 192.168.0.112 is the ipaddress of slave. One can use hostname instead of IPAddresses if they are added in DNS.

Making a machine which is having Internet Explorer 7 installed as slave

 In Command prompt from the folder where you have extracted "Selenium Grid" run

ant -Denvironment=*iexplore7 launch-remote-control -DhubURL=http://192.168.0.111:4444 -Dhost=192.168.0.113
where 192.168.0.111 is the ipaddress of Master and 192.168.0.113 is the ipaddress of slave. One can use hostname instead of IPAddresses if they are added in DNS.

Making a machine which is having Internet Explorer 8 installed as slave
    
 In Command prompt from the folder where you have extracted "Selenium Grid" run
ant -Denvironment=*iexplore8 launch-remote-control -DhubURL=http://192.168.0.111:4444 -Dhost=192.168.0.114
where 192.168.0.111 is the ipaddress of Master and 192.168.0.114 is the ipaddress of slave. One can use hostname instead of IPAddresses if they are added in DNS.

Verify the setup at http://localhost:4444/console. You should see something like

You are done with Slaves Setup. :)

Important: You have to use *iexplore6 or *iexplore7 or *iexplore8 in your Test Cases instead of *iexplore.
I am using ROBOT Framework to run my selenium tests. So I can run tests using
pybot.bat -l Run1.html -o Run1out.xml -r Run1Report.html "C:\Users\yagnanarayana dande\Desktop\TestsIE6.html"
Remember Pybot cannot run in parallel. So start different pybots per environment like

pybot.bat -l Run1.html -o Run1out.xml -r Run1Report.html "C:\Users\yagnanarayana dande\Desktop\TestsIE6.html"
pybot.bat -l Run1.html -o Run1out.xml -r Run1Report.html "C:\Users\yagnanarayana dande\Desktop\TestsIE7.html"
pybot.bat -l Run1.html -o Run1out.xml -r Run1Report.html "C:\Users\yagnanarayana dande\Desktop\TestsIE8.html"

To remove any slave from your grid due to reasons like machine died during execution the use
 http://192.168.0.111:4444/registration-manager/unregister?host=192.168.0.113&port=5555&environment=*iexplore7